

Getting started
Install published fragcap bytes, record passive packet truth, and explicitly calibrate a target before Deep Capture.
Published baseline: v0.10.3.
Release and completion status
These instructions describe guided calibration and native functionality shipped in v0.10.0 on 2026-09-15. Follow documentation matching your installed bytes; v0.10.2 includes the complete S154 through S158 native documentation, review-intake and deterministic certification engineering, while v0.10.3 adds QUIC observation headroom and corrected interactive CLI input. The Native product contract records the exact supported boundary. Optional field observations do not gate implementation completion; file an observed failure against the affected active release.
Capture passively records packets and attributes flows to processes. Deep Capture runs Capture beside an explicit target-scoped local proxy and adds application observations only for traffic reaching that proxy under the required trust and scope conditions. Start with Capture; use guided calibration when you deliberately want to investigate Deep Capture eligibility.
Before you begin
Live packet recording requires Windows, an elevated terminal, and separately installed Npcap in WinPcap API-compatible mode. The native Deep Capture proxy is included. Neither mode reaches inside the target process. Do not configure a system-wide proxy, disable certificate verification, or attempt to bypass pinning.
flowchart TB
  accTitle: Separate packet and application observation dependencies
  fragcap["fragcap"] --> capture["Capture: passive packet truth"]
  fragcap --> deep["Deep Capture: explicitly scoped observations"]
  npcap["Separately installed Npcap"] --> capture
  capture --> deep
  proxy["Included native proxy"] --> deep
  capture --> analyzer["Unmodified pcapng analyzer"]
Npcap supplies live packets, while attribution uses Windows socket and process evidence. Wireshark is an optional analyzer and can install Npcap. fragcap never bundles or redistributes Npcap. See the dependency model and security and privacy guide.
1. Install fragcap and its prerequisites
Download the installer or portable archive from the official releases, and verify its accompanying SHA-256 checksum. The MSI adds fragcap to PATH; the portable archive runs from its unpacked directory. Packages are unsigned, so a checksum checks consistency with the published download, not publisher authentication. Review an Unknown Publisher warning deliberately rather than disabling Windows protections. See packaging and migration.
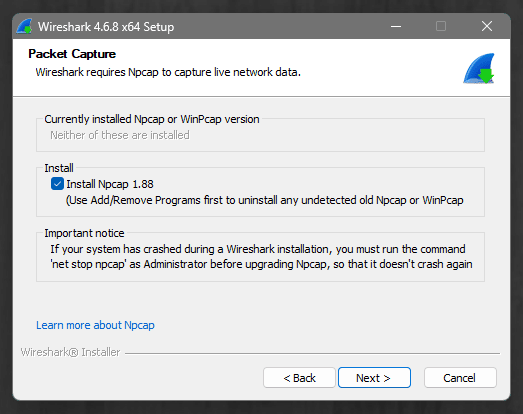
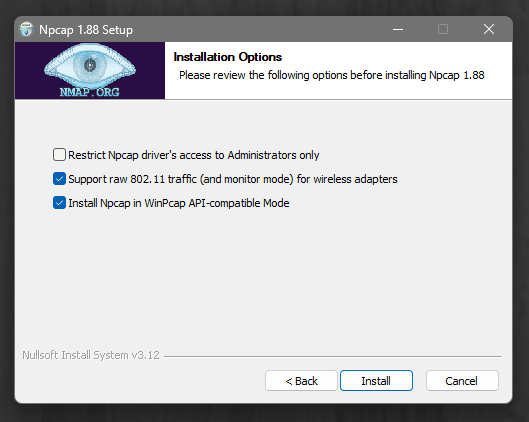
If installing Npcap through Wireshark, leave Install Npcap selected and enable WinPcap API-compatible Mode in the Npcap installer. Loopback support is supplied by current Npcap installations.
2. Verify the environment
Open an elevated terminal and run:
fragcap doctorDoctor is read-only: it starts no capture, proxy, target, or trust change. It reports separate Capture and Deep Capture readiness, environment and driver checks, and native resource ownership and recovery guidance. Unavailable and indeterminate are not ready. Healthy completed history or deliberately retained sensitive evidence is not automatically stale residue to delete. Do not expect a universal synthetic all-green report.
Review named remediation first. fragcap doctor --fix is the individually confirmed action runner, not permission to repair everything. Re-run plain Doctor afterward. Optional fragcap extcap install adds a Wireshark source but is not required for command-line Capture. See Doctor and troubleshooting.
3. Find a target
fragcap targetsThis command discovers installed titles, registers new findings in the effective local store, and lists stored targets. Ready targets precede targets needing setup. A row number is an ephemeral selector for that listing; the handle is stable. Capture readiness, engine detections, and sensitivity coverage do not establish Deep Capture compatibility. Do not substitute a Steam app identifier for a row number in capture.
If a target is missing, inspect fragcap targets add --help or fragcap targets scan --help. Guided calibration can separately propose registration for an exactly resolved installed Steam identifier or display name. Managed stores have defaults; database flags are deliberate overrides, not required boilerplate.
4. Run the first Capture
fragcap capture 1 --duration 5m --out first-capture.fcapngStart the target after Capture arms, or use an eligible prepared managed launch with --launch. Default target scope writes only packets bound to selected target roles. Unattributed and other-process exclusions have separate counters. Select --scope all only when deliberately retaining all acquired traffic with attribution state preserved.
Payload is retained by default for admitted packets. --no-payload selects metadata without packet payload bytes; it does not establish whether omitted bytes were encrypted. Capture does not decrypt traffic. Review fragcap capture --help and Capture modes before changing modes or sinks.
5. Open the packet truth
Open first-capture.fcapng with an unmodified pcapng-aware analyzer. Process image, role, stage, direction, and attribution fidelity appear in standard packet comments. Ignoring annotations still leaves ordinary readable pcapng. Loss accounting describes acquired, omitted, dropped, and refused traffic rather than equating an empty trace with success.
This completes the passive first-run path. Continue only for deliberately selected, authorized local inspection.
6. Check Deep Capture eligibility
Read existing facts without starting anything:
fragcap targets show sample-targetOrdinary Deep Capture needs current applicable proxy-routing = reached-client evidence for the exact target/version, supported cold launch, route, loopback family, measurement case, backend/version, and fragcap version. Unknown, stale, conflicting, wrong-case, or launcher-only evidence does not pass. Protocol behavior, propagation, trust acceptance, and inspectability remain separate facts.
For missing or incomplete evidence, start guided calibration:
fragcap calibrate sample-targetRegistration, executable setup or candidate selection, and every later effectful attempt have separate complete plans and confirmations. Requested protocols are measurement intent, not proof. The workflow measures reachability first when needed, then proposes useful concrete cases from fresh observations. Failure, decline, limitation, interruption, or partial result stops later effects and checkpoints coverage.
If the stored Steam target has no client, calibrate first labels the appinfo executable as a Steam launch hint. It can ask permission to start the selected title from a cold Steam launch and observe which descendant owns network connections. Start the game normally when prompted. One observed socket owner becomes a proposed client under a separate exact setup plan; it is not yet captured traffic or proxy reachability. No owner, several owners, or incomplete observation leaves the target unchanged. If you already know the final client executable, use fragcap calibrate sample-target --client-executable sample.exe to declare it explicitly without a socket question. This declaration is labeled as your choice, not a measurement. After saving a client, close the title and Steam normally, then rerun fragcap calibrate sample-target for a fresh cold reachability session.
During reachability, approving the complete Deep Capture plan starts the scoped proxy, passive Capture, and managed launch. A written bundle is evidence of the attempt, not evidence that the game client was acquired or reached the proxy. Read the calibration diagnosis for the earliest known failed stage, retained target packets, accepted proxy connections, exact fact writes, and cleanup outcomes. An observed zero is different from unavailable evidence. A failed workflow pauses; its --resume command preserves coverage and does not retry the same failed exact case. Correct the reported cause, then start a new calibration workflow with the target selector.
Use the workflow identity and local-store-bound resume command printed by your run, not the specimen identity below:
fragcap calibrate --resume 17 --local-db C:\Users\you\local.db
fragcap calibrate --resume 17 --pause-for login --local-db C:\Users\you\local.db
Resume rebuilds current authority and never reuses a prior plan or response. Pauses record operator-owned login, EULA, update, anti-cheat, gameplay, shutdown, or interruption work, not evidence. Cold direct, Steam platform, and declared publisher chains are supported. Warm applications remain yours to close normally; explicit --restart-warm observes shutdown and never kills a process. See compatibility and calibration for exact limits and advanced measurements.
7. Run a known-compatible Deep Capture
fragcap deep-capture sample-target --launch --duration 5m --harReview the complete plan: target and managed launch authority, exact loopback and routing policy, session CA and current-user trust action, sensitive artifacts, millisecond deadlines, fact writes, cleanup obligations, and refusal boundaries. No listener, bundle, trust, launch, Capture, or fact effect occurs until exact authorization. Output failure, target drift, plan mismatch, expiry, or pending prior-session recovery refuses rather than broadening scope.
Interactive execution requires a complete response line. Structured execution requires --authorize-stdin: read the emitted plan event and return its exact identifier plus one LF in the same process. --quiet and --silent never hide required consent output or authorize effects. Retired trust booleans do not authorize a run. Omit optional HAR or key logging when unnecessary.
Supported paths include HTTP/1.1, HTTP/2, HTTPS, WebSocket, SSE, schema-free gRPC envelopes, generic TCP/UDP, separately verified non-HTTP TLS, and scoped QUIC/HTTP/3. Support is route-, trust-, and traffic-specific, not universal. Pinning is never bypassed. See the traffic matrix and CLI reference.
8. Review the bundle and cleanup
Read manifest.json first. Session outcome, cleanup outcome, artifact finalization/completeness, loss, and traffic inspectability are independent. A complete operation does not prove every flow was inspectable. Partial evidence must not be silently relabeled complete. Output formats explains manifest version 2, packet truth, application JSON Lines version 2, bounded HAR, proxy-owned client-facing TLS key logs, post-collection correlation, durable cleanup streams, sensitivity, and omissions.
Keep bundles private. Packet bytes, URLs, bodies, endpoints, process traces, and key material can expose sensitive information. bundle export makes a separate transformed copy with an exhaustive manifest; it does not edit the original. Sensitive cleanup is an explicit exact action, not a prerequisite to preserving legitimate completed evidence.
fragcap doctor
fragcap doctor --fix
Only run the second command to review named remediation. Exact owned recovery obligations must be reconciled; ambiguous ownership does not authorize unrelated removal. Keep remaining ownership records until recovery is resolved.
9. Uninstall or start fresh
Ordinary uninstall removes installer-owned program effects while preserving targets, writable stores, profiles, captures, settings, and bundles. Explicit fresh-start removal is irreversible and reconciles exact recorded current-user obligations before accepted data deletion. It does not follow links, broaden to custom paths, remove Npcap, or own another profile's CurrentUser trust. See packaging and migration for interactive, silent current-user, and preview-bound all-users workflows.